text tools and filters—and suddenly a simple 30-second video feels like a professional editing project.
I’ve been through that learning curve myself, and one thing became pretty clear:
the best video editor for a beginner isn’t necessarily the one with the most features.
It’s the one that lets you finish your first decent video without making you want to uninstall the app.
Two apps that beginners often come across are CapCut and InShot.
Both can handle basic mobile video editing, but they feel quite different when you actually start using them.
So, if you’re wondering CapCut vs InShot and which one you should install first,
let’s compare them from a practical beginner’s point of view.
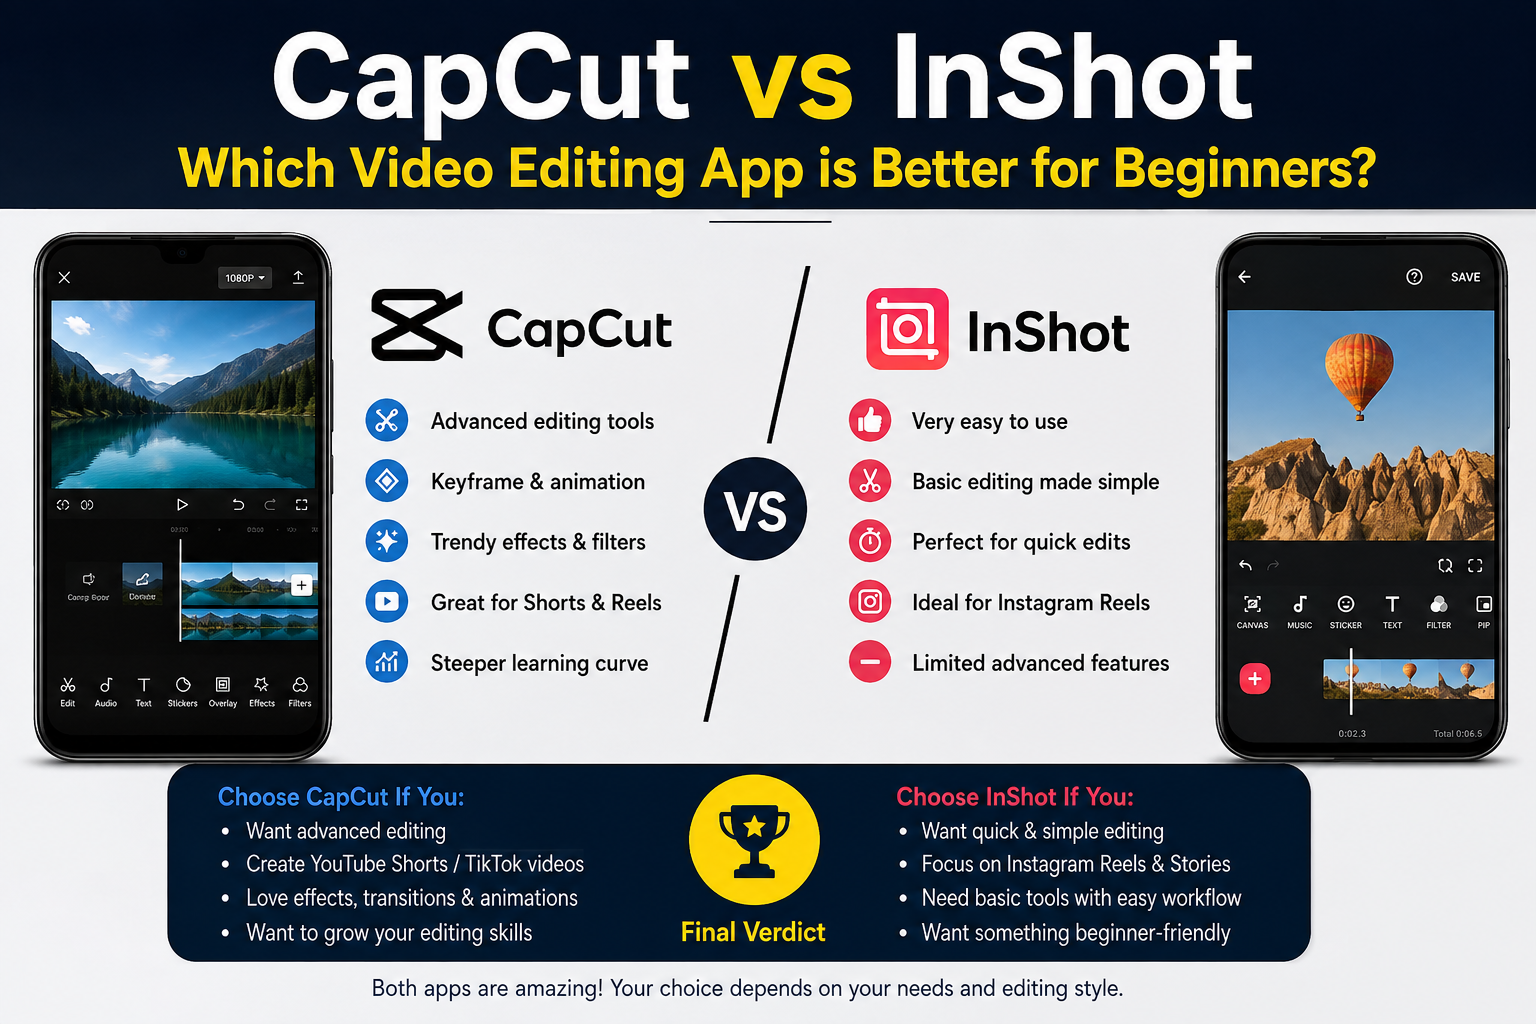
CapCut vs InShot: The Quick Answer
If you want the simplest answer:
Choose InShot if you mainly want quick, straightforward editing.
Choose CapCut if you want more creative tools and plan to learn editing seriously.
If you’re making a simple Instagram video, trimming clips, adding music and putting some text
on the screen, InShot can feel easier.
But if you’re interested in TikTok-style edits, animated text, keyframes, captions,
transitions and more advanced editing controls, CapCut gives you more room to experiment.
That doesn’t automatically make CapCut “better.”
It depends on what you’re trying to create.
CapCut: Where It Really Shines
CapCut is particularly attractive if you want to make short-form content.
Think about the type of videos you see on TikTok, Instagram Reels and YouTube Shorts.
A lot of them use quick cuts, animated text, captions, sound effects, zooms and visual effects.
CapCut gives you plenty of tools for this type of editing.
More Creative Controls
CapCut provides features such as keyframes, speed controls, animations, effects and different text options.
You don’t need all of these as a beginner.
But having them available becomes useful when your editing skills improve.
For example, suppose you want an image to slowly zoom in while you’re talking.
Instead of simply applying a fixed effect, you can use keyframes to control the movement.
That’s the sort of feature that makes CapCut more interesting once you move beyond basic editing.
You can check the latest features and product information on the
official CapCut website
.
Better for Learning Advanced Editing
Another advantage is that you can start simple and gradually become more advanced.
You might begin by cutting clips and adding text.
A few weeks later, you could be experimenting with keyframes, overlays, masking,
speed changes and more detailed timeline editing.
That gives CapCut a bit of a learning path.
You don’t have to change apps immediately when your editing requirements grow.
Useful for Short-Form Content
If your main goal is creating Shorts, Reels or TikTok-style videos, CapCut is worth trying.
The workflow is well suited to vertical video, quick cuts and text-heavy edits.
Just remember that some features, templates or availability can vary depending on your device,
region and app version.
InShot: Why Beginners Often Like It
InShot takes a different approach.
Instead of throwing a huge number of editing options at you immediately,
it feels more focused on everyday mobile editing.
Let’s say you recorded a few clips during a trip.
You want to:
- Remove the boring parts.
- Put the clips together.
- Add some music.
- Add a title.
- Adjust the video size.
- Export it.
That’s where InShot feels comfortable.
You don’t necessarily need to spend a lot of time learning the interface
before you can produce something usable.
For the latest information about the app, you can check the
official InShot website
.
InShot Is Great for Quick Social Media Videos
Imagine you’re preparing a simple Instagram Reel.
You recorded a 60-second video but there are several pauses in it.
Open InShot, import the video and use Split to cut around the unwanted sections.
Delete those sections, add your text, adjust the volume,
choose the required aspect ratio and then export.
For this type of job, you don’t need a complicated editing workflow.
And that’s one reason I wouldn’t automatically tell every beginner to use CapCut.
Sometimes simple really is better.
CapCut vs InShot: Editing Experience
Here’s how I would describe the difference.
InShot feels like:
“I know what I want to do. Let me do it quickly.”
CapCut feels more like:
“I want to experiment and see what I can create.”
Neither approach is wrong.
If you’re someone who gets annoyed when an app has too many buttons,
InShot may be easier to learn.
If you enjoy experimenting with effects and learning new editing techniques,
CapCut may be more exciting.
Which One Is Easier for a Complete Beginner?
For someone who has never edited a video before,
I’d give InShot a slight advantage for basic editing.
The reason isn’t that CapCut is extremely difficult.
It’s simply that CapCut offers more features, and more features can mean more things to learn.
Imagine you’re learning to drive.
You don’t need a dashboard with 50 buttons on your first day.
You just need to understand the basic controls.
Video editing is similar.
Learn the essentials first.
Once those become familiar, advanced features stop looking complicated.
Which App Is Better for YouTube Shorts?
This is where I’d lean toward CapCut.
If your plan is to create short videos regularly, you’ll probably eventually want things like:
- Animated text
- Captions
- Overlays
- Speed adjustments
- Keyframe animations
- Sound effects
- Creative transitions
- More detailed timeline editing
You don’t necessarily need all of these for every video.
But having them available can be useful.
Which One Is Better for Instagram Reels?
It depends on your style.
For a basic Reel containing talking footage, photos, music and text,
InShot is more than enough.
For fast-paced Reels with animated elements and more creative effects,
CapCut has the advantage.
For example, suppose you’re making a restaurant Reel.
You have a 5-second exterior shot, a 4-second food shot,
a 3-second close-up and a 6-second talking clip.
InShot can easily help you turn these into a clean Reel.
But if you want the food to zoom in exactly when the beat drops,
add animated text and synchronize several visual changes with the music,
CapCut gives you more tools to play with.
A Mistake I Would Avoid as a Beginner
One mistake I see beginners make all the time is adding too many effects.
They discover transitions and suddenly every clip has a different transition.
Then they discover filters, stickers, animated text and sound effects.
The final video looks busy rather than professional.
A cleaner edit is often better.
Try this instead:
Cut unnecessary footage → arrange clips → adjust audio → add simple text → use one or two transitions → export.
Another Common Mistake: Editing Everything in One Take
If you’re making a talking-head video, don’t feel like you need to record the entire thing perfectly.
Record in smaller sections.
Clip 1: Introduction
Clip 2: Main point
Clip 3: Example
Clip 4: Ending
Then put them together in the editor.
If you make a mistake in Clip 3, you don’t have to record the entire video again.
How to Edit Your First Video in InShot
Step 1: Import Your Clips
Open the app and select the videos or photos you want to use.
Don’t worry about making everything perfect immediately.
Step 2: Remove Unnecessary Footage
Use the trim and split tools. Cut out:
- Long pauses
- Mistakes
- Empty sections
- Unwanted camera movement
Step 3: Arrange Your Clips
Put the clips in the order in which you want viewers to see them.
Step 4: Add Text
Don’t put huge amounts of text on the screen.
Use short phrases that support what you’re saying.
Step 5: Add Music if Necessary
If you’re using background music, keep its volume low enough
that it doesn’t overpower your voice.
Step 6: Check the Entire Video
Watch the exported video—or at least preview the entire timeline—before posting.
How to Edit Your First Video in CapCut
Step 1: Create a New Project
Import your clips.
Step 2: Cut the Unnecessary Parts
Use the split and delete tools to remove mistakes and boring sections.
Step 3: Add Text or Captions
Keep the text readable.
Don’t place important words too close to the edges because social media interfaces
can cover parts of the screen.
Step 4: Adjust Audio
Make sure your voice is clear.
If you’re using music, don’t let it overpower your speech.
Step 5: Experiment With One Advanced Feature
Don’t try ten advanced tools at once.
Pick one, such as keyframes, and learn how it works before moving on.
What About Watermarks?
Watermarks and export behavior can change with app versions, features and specific workflows,
so it’s worth checking the current export screen before you start a project.
Don’t assume that an old YouTube tutorial showing one version of an app
will behave exactly the same way today.
Mobile editing apps change frequently.
Performance: Don’t Ignore Your Phone
The editing app isn’t the only thing that matters.
Your phone matters too.
Editing a short 1080p video is usually much easier than working with long,
high-resolution footage and multiple effects.
If your phone starts becoming hot or the preview begins to lag, try:
- Closing unnecessary apps
- Freeing some storage
- Using shorter clips
- Reducing unnecessary effects
- Restarting the phone
- Exporting at a sensible resolution
You don’t always need the highest possible settings.
For many social media videos, a properly exported 1080p video is perfectly reasonable.
CapCut vs InShot: Feature Comparison
| Feature | CapCut | InShot |
|---|---|---|
| Beginner-friendly basic editing | Very good | Excellent |
| Simple trimming | Excellent | Excellent |
| Advanced editing | Strong | Good |
| Keyframe-style editing | Yes | More limited |
| Creative effects | Strong | Good |
| Quick social videos | Excellent | Excellent |
| Learning curve | Moderate | Easier |
| Simple workflow | Good | Excellent |
| Room to grow | Excellent | Good |
Which Video Editor Should You Choose?
Choose InShot If:
- You are completely new to editing
- You want to trim videos
- You want to join clips
- You want to add music
- You want simple text
- You mainly create Instagram posts and Reels
- You want to edit videos quickly
Choose CapCut If:
- You want to make YouTube Shorts
- You create TikTok-style videos
- You want animated text
- You want to experiment with effects
- You want to learn more advanced editing
- You want more creative control
The Best Way to Decide
Don’t spend three days watching comparison videos.
Install one of them and make the same 30-second video.
- Cut the clips.
- Add music.
- Add text.
- Adjust the audio.
- Add one transition.
- Export the video.
Then try the same project in the other app.
You’ll quickly discover which interface makes more sense to you.
That’s a much better test than simply reading a list of features.
Common Beginner Mistakes to Avoid
Using Too Many Effects
Effects should improve the video, not distract from it.
Ignoring Audio
Viewers may forgive average video quality, but poor or distracting audio
can make a video difficult to watch.
Exporting Without Checking
Always preview your final video before uploading it.
Copying Every Trend
A popular editing style doesn’t automatically fit every type of content.
Using Too Much Text
Keep important text short and easy to read on a phone screen.
Filling Your Phone Storage
Video files can become surprisingly large.
Delete unused clips or move old projects when storage starts getting low.
Frequently Asked Questions
Is CapCut better than InShot for beginners?
Not necessarily. InShot can be easier for basic editing,
while CapCut offers more advanced tools for beginners who want to learn more.
Is InShot good for YouTube Shorts?
Yes. You can use InShot to trim clips, add music, text and other basic elements needed for a Short.
Is CapCut good for beginners?
Yes. CapCut has a larger selection of tools, so the interface may take a little longer to learn,
but beginners can start with its basic editing features.
Which is easier, CapCut or InShot?
For straightforward editing, many beginners may find InShot easier to understand.CapCut can take longer to learn because it provides more creative controls.
Can I edit videos on an iPhone with both apps?
Both apps are designed for mobile video editing, but the exact features and availability can vary by operating system and app version.
Which app is better for Reels?
Both can work well. InShot is a good choice for simple Reels, while CapCut may be more suitable when you want more advanced effects, animation and creative editing.
Final Thoughts
CapCut and InShot are both useful mobile video editors, but they’re aimed at slightly different types of users.
If your priority is simplicity and quick editing, start with InShot.
If you want more creative control and a larger set of editing tools, CapCut is probably the better starting point.
And here’s the part I wish more beginners understood:
The app won’t make you a good editor.
You can have dozens of effects and still make a boring video.A simple edit with good timing, clear audio and a strong story will usually work better than a video overloaded with transitions. So don’t worry about learning every feature on day one. Pick one app, make a few videos, learn from your mistakes, and gradually add new techniques.
Once you can edit a clean 30-second video without constantly searching for where every button is, you’re already much further along than you think.
